🚀 Guide rapide : vos 15 premières minutes
Durée estimée : 15-20 minutes
Niveau : 🟢 Facile
Une fois terminé : Vous aurez votre premier client, votre première piscine et une visite programmée
🎯 Qu'allons-nous faire ?
Dans ce guide, nous allons suivre les premières étapes de base afin que vous puissiez voir comment fonctionne PoolControl. Une fois terminé, vous aurez :
- ✅ Un client enregistré (ex : « Hôtel La Palmera »)
- ✅ Un pool associé à ce client
- ✅ Un technicien attitré (ou vous-même si vous travaillez seul)
- ✅ Une visite programmée sur le calendrier
::: astuce 💡 Conseil Ne vous inquiétez pas si les données ne sont pas réelles. C'est une pratique. Ensuite, vous pouvez tout supprimer et recommencer pour de vrai, ou modifier ce que nous avons créé. :::
📋 AVANT DE COMMENCER : Vérifiez ceci
✅Avez-vous accès au programme ?
- Ouvrez votre navigateur (Chrome recommandé).
- Accédez à **https://poolcontrolpro.com/login
**. 3. Entrez votre email et votre mot de passe. 4. Après avoir entré, l'application reste à https://poolcontrolpro.com/app/pool-control (tableau de bord).
Vous devriez voir le tableau de bord avec les onglets ci-dessus et le menu latéral (le menu exact dépend de votre rôle) :
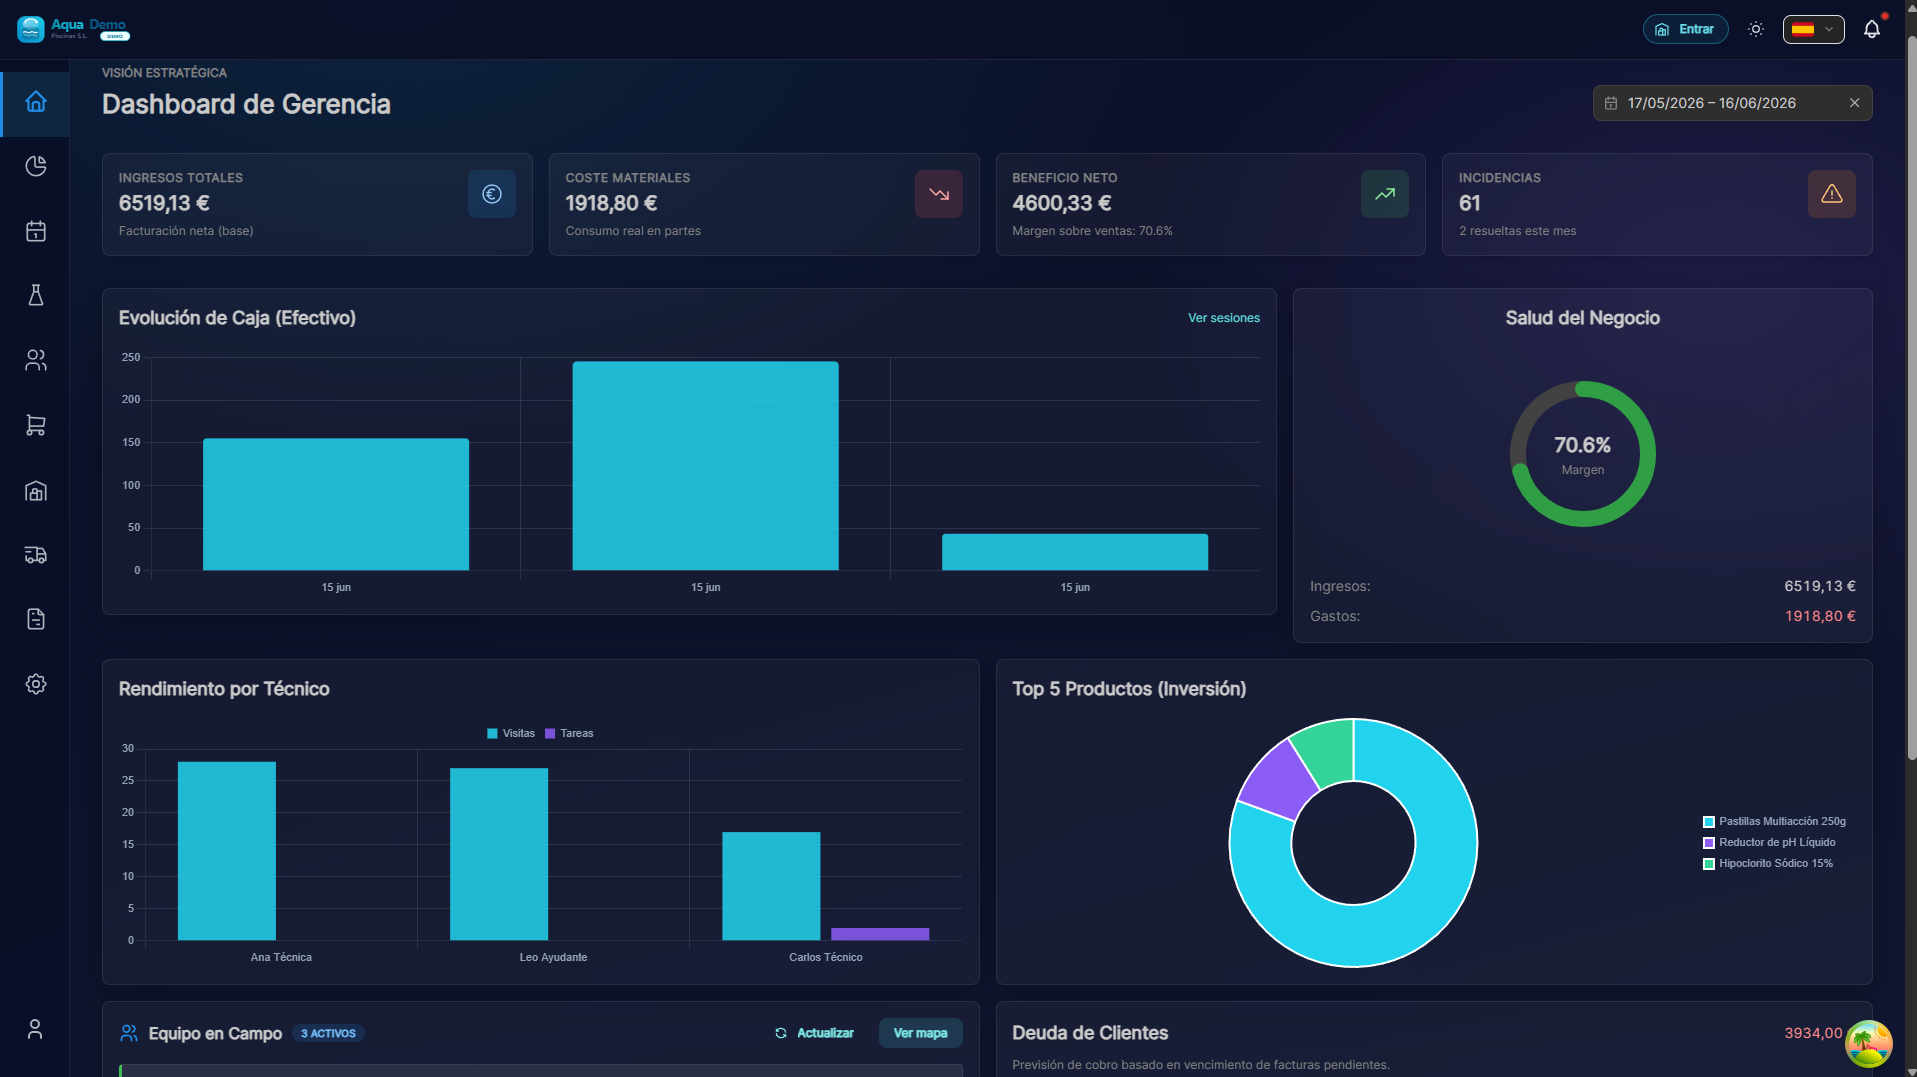
Captura con datos demo AquaDemo.Capturez avec les données de démonstration AquaDemo.Si vous voyez ceci : Parfait ! Continuer.
Si vous ne voyez pas ceci :
- Recevez-vous une erreur de mot de passe ? → Appuyez sur "Mot de passe oublié ?"
- La page ne se charge pas ? → Vérifiez votre connexion Internet
- Une autre erreur ? → Écrivez-nous à info@poolcontrolpro.com
✅ Le menu latéral est-il visible ?
Le menu latéral est la barre de gauche (ou en haut sur mobile) avec des options telles que "Clients", "Planification", "Ventes"...
Si vous ne le voyez pas : Recherchez une icône avec trois lignes ☰ (menu hamburger) et appuyez sur.
📝 ÉTAPE 1 : Créez votre premier client (3 minutes)
Qu'est-ce qu'un client ?
Un client est la personne ou l'entreprise qui vous paie pour nettoyer sa piscine. Cela peut être :
- Un hôtel
- Une communauté de voisins
- Une maison privée
- Un club de sport
Instructions étape par étape
1. Accédez aux clients et aux pools
Si vous voyez les onglets ci-dessus (Administrateur/Gestionnaire) :
- Onglet Opérationnel.
- Clients et pools.
Si vous voyez un menu classique à un seul niveau : Gestion → Clients et pools ou Clients directement.
Chemin direct :/app/pool-control/clients#### 2. Press the "New Customer" button
At the top right you will see a button that says "+ New Customer" (or a blue button with a +):
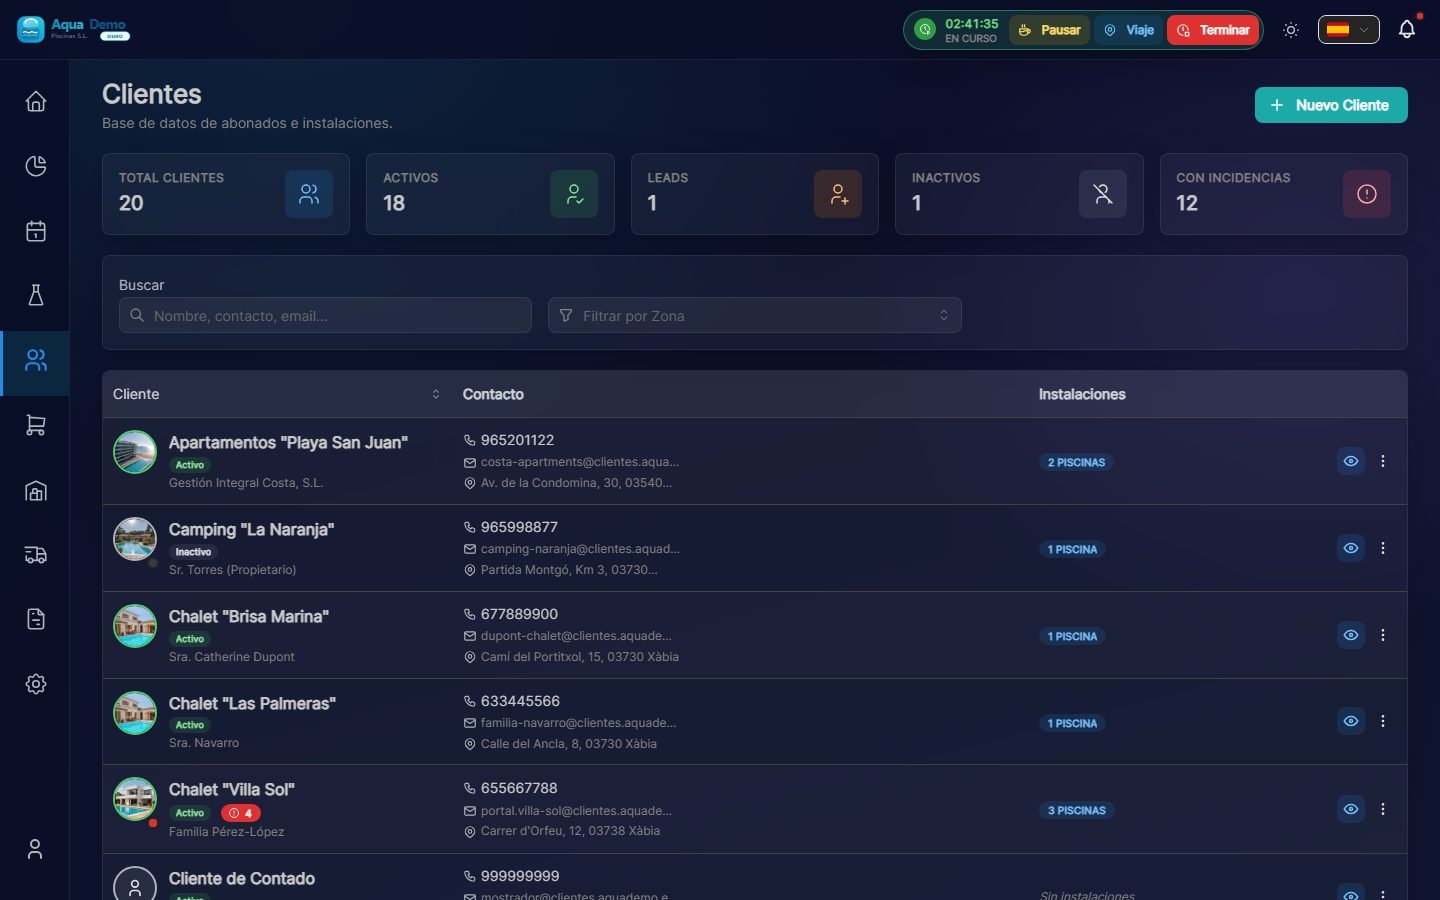
Captura con datos demo AquaDemo.Capture with AquaDemo demo data.
3. Fill in the customer information
A form will open. Let's explain each field:
Field: "Customer Name" (Required)
What to enter: The name of the company or person.
Examples:
- ✅ Hotel La Palmera S.L.
- ✅ Community of Owners El Sol
- ✅ Juan García (private)
- ❌ (do not leave blank)
💡 Trick
If the name contains "Hotel", "Community" or "Club", PoolControl will automatically put a nice icon.
Field: "Customer Type"
What it is: It is used to classify your clients.
Options:
- Active → Normal client you are serving (the majority)- Lead → Potential client who has not yet hired you (you are negotiating)
- Inactive → Client who stopped working with you
What to choose: Select "Active" for this practice.
Field: "Email" (Optional but recommended)
What to enter: The client's email (to send invoices).
Example: recepcion@hotellapalmera.com
Field: "Phone" (Optional)
What to enter: A contact telephone number.
Example: 912345678
Field: "Tax Address"
What to enter: The address that will appear on the invoices. It may be different from the address of the pool.
Example:
- Street: Calle Mayor, 123
- City: Madrid
- Postal Code: 28001
- Province: Madrid
4. Press "Save"
At the bottom you will see a "Save" (or "Create Client") button.
If all goes well: You will see a green message "Customer created successfully" and you will be returned to the customer list where your new customer will appear.
If there is an error: Read the message. Surely you need to fill out a required field (marked with *).
🏊 STEP 2: Add a Pool to the Client (3 minutes)
What is a swimming pool?
The pool is the physical place where you are going to work. A client can have:
- A swimming pool (most houses)
- Various swimming pools (hotels, large communities)
- Pool + jacuzzi (count as 2 different pools)
Step by step instructions
1. Enter the client file
In the customer list, click on the name of the customer (or row) to open the quick view; From there you can go to the complete file:
Captura con datos demo AquaDemo.Capture with AquaDemo demo data.
2. Go to the "Installations" tab
Within the client file you will see tabs such as:
- Facilities ← here are the pools
- Billing (if your role can see it)
- Documents
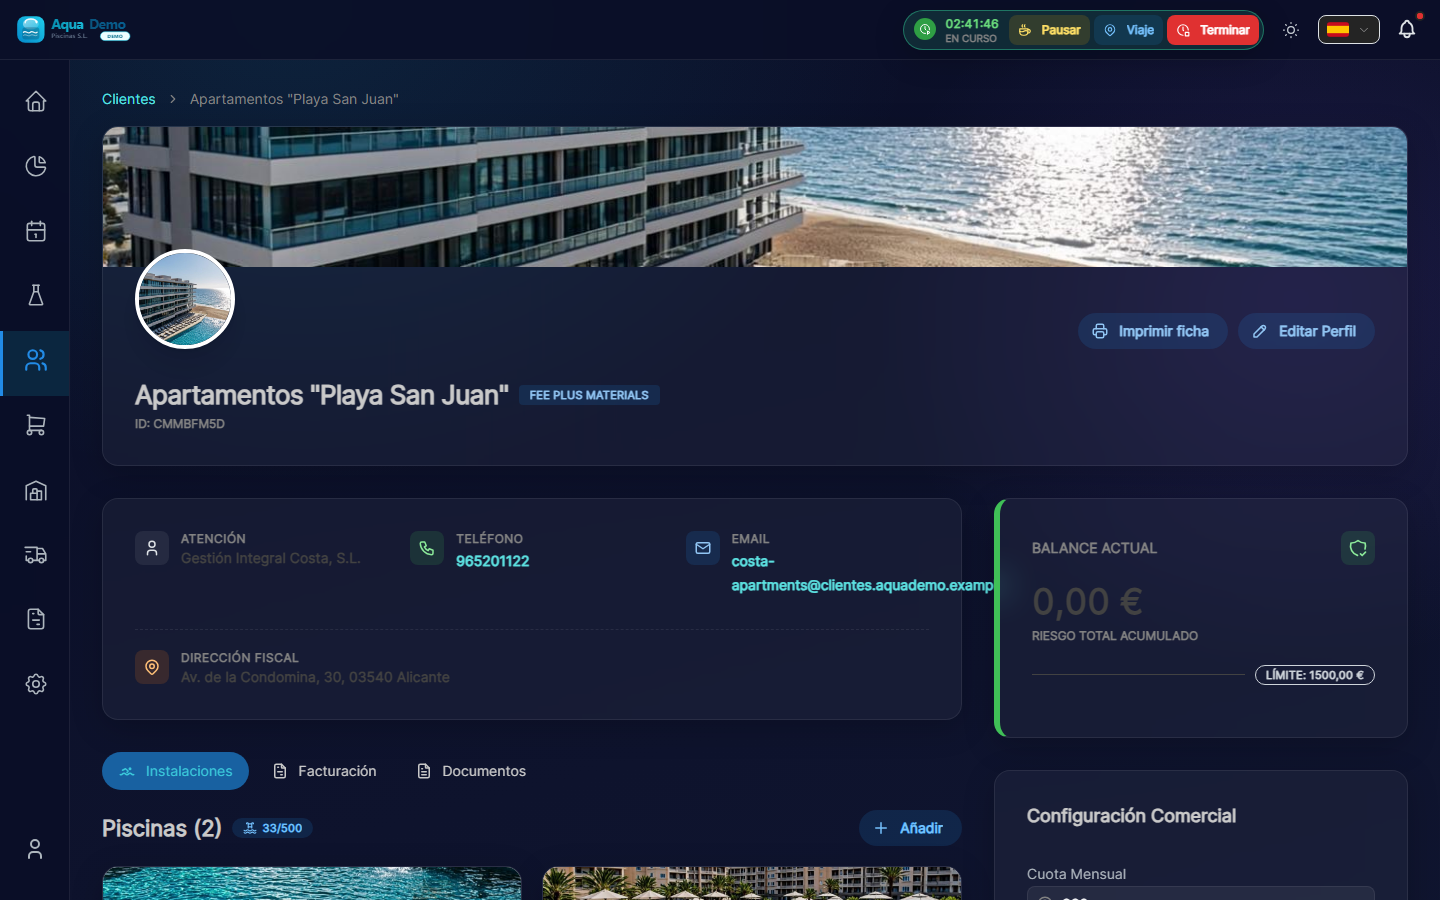
Captura con datos demo AquaDemo.Capture with AquaDemo demo data.
3. Press "Add"
At the top of the list you will see the "Add" button (+ icon).
4. Fill in the pool details
Field: "Pool Name" (Required)
What to enter: A name to identify it.
Examples:
- "Main Pool" (if there is only one)
- "Adult Pool"
- "Children's Pool"
- "Outdoor Jacuzzi"
Field: "Address"
What to put: Where the pool is physically. It may be different from the customer's tax address.
Example:
- Street: El Sol Urbanization, Block 3
- City: Madrid- Postal Code: 28001
Field: "GPS Coordinates" (Very important)
What it is for: So that the technician can navigate with the mobile phone to the exact pool.
How to fill it out:
Option A - Search on the map:
- Press the map button 🗺️
- Type the address in the search bar
- Press "Search"
- Drag the red pin until it is exactly over the pool
- Press "Confirm"
Option B - If you have the exact coordinates:
- Latitude: 40.4168
- Length: -3.7038
⚠️ Important
GPS must be accurate. If you put the pin at the entrance of the building, the technician will get lost. Try putting it right above the pool if it is visible on the satellite, or at the access door to the pool area.
Field: "Pool Type"
Options:
- Public → Shared (communities, hotels, clubs)
- Private → Private house
Select the one that applies.
5. Press "Save"
If all goes well: You will see the pool added to the client's list.
⚙️ STEP 3: Pool maintenance plan (3 minutes, optional)
In the pool file (click its name from Facilities) you will see the block Active Maintenance Plan and, to the right, Add to Service.
Instructions
1. Check the catalog (first time only)
Items come from master tables:
- System (or catalog in Management → Auxiliary Tables): Measurement Parameters and Maintenance Tasks.
If the demo seed already includes pH, chlorine and basic tasks, you can skip this step.
2. Add parameters and tasks to the pool
In the Add to Service column:
- Under PARAMETERS, press for example pH and Free Chlorine.
- Under TASKS, press the ones that apply (pool cleaner, skimmer...).
- For each item you can adjust frequency and thresholds in the Item Configuration modal.
Without an active plan, the technician can still work, but the report will show fewer guided fields.
👷 STEP 4: Create a Technician (or register yourself) (3 minutes)
If you work alone, this step is to register yourself as a technician. If you have employees, you will register them here.
Instructions
1. Go to Team
Tabs: System → Computer.
Path:/app/pool-control/settings/team#### 2. Appuyez sur "Nouvel employé"
3. Remplissez les données
Champ : "Nom" (Obligatoire)
Exemple : Juan García
Champ : "E-mail" (obligatoire)
Exemple : juan@votreentreprise.com
::: avertissement ⚠️ Important Cet e-mail sert à ce que le technicien puisse accéder à l'application. Il doit s'agir d'un véritable email auquel le technicien a accès. :::
Champ : "Rôle"
Options :
- Technicien → Il ne voit que ses piscines et son travail (choisissez ceci)
- Manager → Peut voir et modifier presque tout
- Administrateur → Contrôle total
Que choisir : "Technique"
Champ : "Couleur"
À quoi ça sert : Sur le calendrier, les visites de ce technicien apparaîtront dans cette couleur.
Exemple : Bleu
4. Appuyez sur "Enregistrer"
Que se passe-t-il maintenant :
- L'utilisateur est créé
- Le technicien recevra un email pour activer son compte
- Il apparaîtra sur le calendrier pour attribuer des visites
📅 ÉTAPE 5 : Planifier une visite (3 minutes)
Le moment de vérité est arrivé ! Nous allons dire au programme que Juan (votre technicien) doit se rendre à l'hôtel La Palmera.
Instructions
1. Ouvrez l'agenda
Opérationnel → Agenda (Drag & Drop) (/app/pool-control/planner).
2. Créez une visite unique
- Appuyez sur + Visiter (en haut de l'agenda).
- Le modal Planifier une visite s'ouvre.
- Remplissez :
- Pool — celui que vous avez créé.
- Technicien — l'utilisateur technique de l'étape 4.
- Date et heure — par exemple demain à 10h00.
- Durée — minimum 15 min (par défaut, elle est généralement de 60).
- Appuyez sur Créer une visite.
::: astuce Des visites qui se répètent Pour une maintenance hebdomadaire fixe, utilisez Itinéraires principaux (Opération → Itinéraires principaux), et pas seulement des visites individuelles dans l'agenda. :::
3. Alternative : faire glisser depuis le dock
Si vous voyez le panneau travaux en attente dans l'agenda, vous pouvez faire glisser les visites vers le calendrier (en fonction des autorisations).
Félicitations ! Vous venez de créer votre première visite programmée.
🎉 ET MAINTENANT ?
Pour visualiser la visite sur le calendrier :
- Accédez à Planification
- Recherchez la date que vous avez choisie
- Vous verrez un petit carré bleu (ou la couleur du technicien) avec le nom de la piscine
Pour que le technicien le voie sur son mobile :
- Même site Web : https://poolcontrolpro.com/login (peut être installé comme raccourci / PWA).
- Entrez avec votre email et votre mot de passe.
- Si vous avez plusieurs rôles, choisissez la vue Technicien dans le profil.
- Accédez à Mon itinéraire : la visite y apparaît.
✅ Checklist : L'avez-vous atteint ?
Vérifiez que vous avez tout ça :
- [ ] Un client créé (Hôtel La Palmera ou celui que vous avez mis)
- [ ] Un pool associé à ce client
- [ ] La piscine a un GPS configuré
- [ ] La piscine a configuré des tâches (nettoyer le fond, etc.)
- [ ] Un technicien créé (Juan García ou celui que vous mettez)
- [ ] Une visite programmée dans le calendrier
S'il manque quelque chose : Revenez à l'étape correspondante.
🆘 Si quelque chose n'a pas fonctionné pour vous...
"Je ne trouve pas le bouton Nouveau client"
→ Opérations → Clients et pools (ou Gestion → Clients). Le bouton Nouveau client se trouve en haut à droite. Vous avez besoin d'une autorisation de modification du client.
"Cela ne me permet pas de sauvegarder"
→ Vérifiez s'il y a des champs marqués en rouge ou avec un *. Ils sont obligatoires.
"J'ai créé la visite mais je ne la vois pas sur le calendrier"
→ Vérifiez la date avec les flèches du calendrier. Vérifiez les filtres techniques et zone dans la barre supérieure de l'agenda.
"Mon technicien ne reçoit pas l'email"
→ Vérifiez le dossier Spam. Si ce n'est pas le cas, accédez à Paramètres → Équipe, modifiez le technicien et appuyez sur « Renvoyer l'invitation ».
🚀 Et maintenant ?
Vous avez plusieurs options :
Option 1 : Continuez à vous entraîner
👉 Liste de contrôle de configuration complète - Tout ce dont vous avez besoin pour être 100% opérationnel.
Option 2 : Apprendre une fonction spécifique
👉 Utilisez recherche et écrivez ce que vous voulez apprendre (ex : "comment faire des factures")
Option 3 : Résoudre un problème
👉 Allez dans Dépannage
Vous avez terminé votre première configuration. Maintenant vous savez :
- ✅ Qu'est-ce qu'un client et un pool
- ✅ Comment créer des visites
- ✅ Comment fonctionne le calendrier
Rappelez-vous : Ce n'était qu'un entraînement. Quand vous le souhaitez, supprimez ces données de test et commencez par vos vrais clients.
Des questions ? Écrivez-nous à info@poolcontrolpro.com